Tuesday, June 22, 2010


I actually have accomplished some things. Not as much as I should've, but some. Sadly, I still cannot find my camera. So instead of proving that I actually can get work done on new projects, I bring you some pictures of the Yowie!


These are screen shoots taken from the actual film, so they are quite dark. I'm hoping to get a well lit photo, but no luck yet.

Can you find the Yowie in picture #3?

It took me a minute. The figure on the left is the actor walking through the forest, and on the right, the Yowie is following him!

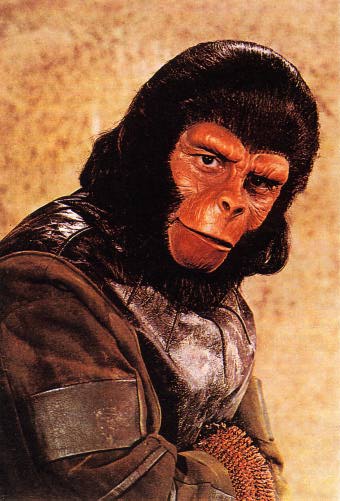
This last photo is a picture of the mask once it was enhanced with some paint. I am pleased with the face, although I feel that in the screen shots there is too much contrast between the hands/face and the fur. I'm told this is a good thing, otherwise we would not've been able to see the Yowie at all. The fur suit served its purpose, I don't like the obvious wrinkles, but there's nothing I can do about it now.

Tuesday, June 15, 2010

Procrastination makes it happen...

Sooooo...I bought my zip ties. And then I got to thinking that wouldn't it be fun if my mock-up was wearable. That maybe I'd take out the zip ties after I fit it and do cord boning to see what that was like. So then I decided I should dye the factory cotton before I cut it so that its pretty. And I haven't gotten around to that yet, so I haven't gotten around to mocking up.

I think too much. I am also thinking about doing a front lacing set of stays IN ADDITION to the stays without front laces. I found a cute calico-ish print in my stash that I want to use as the outer layer.

Also, I want to make a corded petticoat for a Halloween costume that I made last year for a friend. She doesn't like hoops, but the skirt needs something more to support it.

Also I found the fabric I want to line my now-reversible stays in. Sadly, it is currently on back-order, and probably won't be available until July 1st, so I'm waiting on my entire fabric.com order until then so I can have it all shipped in one package, because I live close to the border, so I can get it shipped to this shipping/recieving place in the U.S., thereby taking advantage of the website's free shipping offer. *Deep breath* Isn't it gorgeous? I can't wait. However, the fabric.com order includes the fabric for the corded petticoat.

So. I have plans to search out dye tomorrow (I *had* some, but I don't know if its in storage here in my parent's garage, or if I left it with a friend in Vancouver) and dye a chunk of factory cotton for stay-mocking.

And I'm making a purse. A non-costumey hobo bag with a free pattern from Hot Patterns. Its cow print, which is perfect for me because cows are sort of my totem animal. I cut everything out on Sunday, and I purchased a zipper and thread yesterday. I am always out of black thread. Hopefully I will get it sewn together tomorrow. Assuming I can find my camera (which has been MIA since my last post) I will post a picture of it when it is done. And my dying. (dyeing?)

Sunday, June 6, 2010

Stays!

So, I have discovered that my Butterick pattern 4484 is the same set of stays as Butterick 4254. Thanks to American Duchess! So I am going to move forward with this project.

On the right is the silk noil that I purchased for the outer layer, and left is a linen for the foundation layers. I was going to line the stays with the linen as well, but I've seen a few examples of reversible stays in my internetting, so I'm going to rummage through my stash to see if I have something cute to use as lining, even though it will probably be poly-cotton.

I am still undecided on whether or not to have visible boning channels. On one hand, all the existant examples that I have looked at (thanks to 18th Century Stays and their list of images online). On the other hand, I could do up the foundation layers and fit them without even cutting the silk, and then cover the foundation. But maybe that would make it a 'boned bodice' rather then 'stays'.

I originally had these grand ideas of hand stitching the whole thing. After my adventures in Yowie-land, I've given up on this plan. I'm sure I will find more then enough hand stitching in the construction process to statisfy my urges for period accuracy. I'm not sure about using linen thread. That was part of the grand original plan as well, but I'm not sure if I can run linen thread through my machine, or how it will hold up compared to good old polyester thread. I will do thread-bound lacing holes! To make up for giving up on hand sewing.

I was also going to order plastic whale bone from Farthingales, but American Duchess got me thinking about zip-ties instead. Cost effectiveness is key.

Basically, I have no idea what I'm doing. Except that I do. I'm going to make a factory cotton mock up, with zip-tie boning, and fit that. And go from there.

Saturday, June 5, 2010

Crazy slowly going am I...

I'm hallucinating a pattern. I swear there was a main stream (Butterick/Simplicity etc) pattern for a late Victorian bustle dress, that pictured a woman in a pink dress on the envelope. I think she may've had her foot up, possibly on the running board of an old timey car, but I also might be confusing it with the pattern that is out there for 'driving jackets'. The dress in the picture looked fairly poorly made, and the pattern over-simplified, which is why I never bought it, but now I am wishing for it because I want a pattern to manipulate into something I want. Can't find hide nor hair of it on the internet, in or out of print, so I guess I must be crazy.


I want to make the 'jacket' of this dress, and I want a pattern to start me off for the bodice. I'm fairly confident that I can drape the skirt, but not confident in my ability to drape/draft the bodice. Much more sure of my ability to manipulate an existing pattern. I will find another pattern to work off of, but its bugging me that I can 'see' the pattern I want so clearly in my mind's eye, and not find it anywhere.

Thursday, June 3, 2010

Stays...

I was going through my box of patterns, and came across a discontinued Butterick pattern that I must've grabbed from the discard box in my Fabricland days. The pattern envelope does not date the stays, but the inclusion of panniers and some googling confirm that its probably late 18th century. I don't want front lacings, but I imagine that that would be a fairly straight forward alteration.


What concerns me is I can't find many reviews about it online. And I'm not sure enough to start cutting up my silk noil for something that's less then accurate.

P.S. Is it more accurate to stitch your boning casings through all 4 layers, having visible casings, or to only stitch the casings through the two foundation layers, or foundation layers and lining?

Sunday, May 23, 2010

Boring post

Well, I survived 25 hours off travel, and I'm now back in Vancouver. No interesting sewing will be happening for a few days, but I will be stocking up on supplies for some project I want to work on over the summer, and trying to convince my (former) teacher that she should loan me a dress form for the summer.

An 18th century pair of stays (part of a larger project, eventually), a non-specific boned bodice and skirt for a princess costume, felt fruits, veg, and other play food, a Jedi robe, ..., ..., are all on my to-do list for the summer. Stay tuned! I have my eye on some gorgeous silk noil for the outer layer of my stays, which would theoretically become part of a Queen of Hearts costume based on a polonaise dress. (I worked at a fabric store before I went away, and am hoping they still have the fabric I am refering to. Also, this really fun floral print that I want to make high-waisted sailor front shorts out of.)

Thursday, May 20, 2010

Fail blog.

So, after my success with the yowie face, I had these grand plans of making monster gloves as well. I painstakingly hand stitched together a very basic glove - a blown up tracing of my boyfriend's had, two layers, stitch around the outside. I didn't want to do a proper glove because I wanted to minimize the seams, and theoretically make my life easier. The stitching was painful. The only leather needle I could find was in a package of "repair needles", and the one that was labeled 'leather' was not sharp enough to go through the hide. There was one labeled 'Tent/Deck Chair/Canvas' (sure, whatever) that had a sharp end in the triangle shape that I think of a leather needle, and that went pretty well for the thumb and the index finger, and then the eye broke. So I tried the 'Sacks/Packing' needle which had the same type of end, but was much larger. To big, and the eye would barely go through the holes it made. The 'Bookbinding/Sailmakers' needle bent. In an act of desperation, I went to my book of regular old hand stitching needles and found that the regular old sharp needles went through the leather just find. After a while, I developed a system of piercing holes with the broken leather needle, and then stitching through them with the sharp. I still broke 6 sharps while stitch the one glove, and my fingers were so sore I had to use pliers to pull the needle through after the middle finger. Totally lame.


So finally finish sewing the glove, looks alright, I know from a prior experiment that the leather is too stiff to turn when its dry, so I get it wet and begin the painstaking process of turning the fingers right side out. Much use of the pliers was needed to make this happen. Anyway, finally get it turned (mostly) and my boyfriend tries it on. He can get it on his hand, but all the 'loose-ness' I was hoping to have to wrinkle and texture does not exist. It fits, quite literally, like a glove. And at this point it is about 9 pm on Thursday, and I am leaving Brisbane for good early Saturday morning. I still have to do pesky things like pack. So we made the executive decision to buy some monster hands instead. Credit card to the rescue!

In this picture, the mask is still being held on by elastic bands. Its been upgraded to a proper elastic behind the head now. It is going to be enhanced with some paint, but I won't be around to do that. I'm pretty pleased with it, considering I've never done this before.


P.S. The boyfriend is much better looking withough the mask.

Monday, May 17, 2010

Mask time

Pretty, right? :p I think I'll leave it like this. Actually, this is my test drive for the actual mask. I got a hide of vegetable tanned leather, and I'm going to make the mask, and gloves, out of it. Vegetable tanned leather can be molded and shaped when it is wet, and when it dries, it keeps its shape. We had an opportunity to play with it once when I was at school. The film doesn't have a make-up artist on board yet, and they weren't sure if they would be able to get someone with special effect experience who could do a creature face. Veg tan leather is used for venetian masks, and boiled leather armor etc. I have never made a mask with it before, let alone a creature mask. But no one really knows what a yowie looks like, so no one can tell me I got it wrong.
I did some tests on a piece of the leather to figure out some techniques to add texture to the face. I'm taking my inspiration from this.


So, here is the first draft of the Yowie Mask. Not as much texture as I originally imagine, but I decided to stop for now, rather then take it to far. Once it has dried, I'm going to put it on the boyfriend's face and see how that effects it, and go from there. Looking at the Planet of the Apes picture again, I'm wishing I had done the nose more like that.

Giant fur one-sie


Thanks the director of photography's mom's sewing room, I whipped up the Yowie in a couple of hours. I have to spend some time picking the fur out of the seams so they aren't so obvious, but everyone is pleased with the out come, and boyfriend says he's going to wear it for Halloween, and possibly as pyjamas on cold nights :p

The assembly went very smoothly, nothing interesting to report. There were two adorable dachshunds who kept me company while I put it together, and wanted to sleep on the fur.

I pieced together the hood, and didn't realize til after I had cut it out that the side panels have the nap going up like the body, and the top piece goes down. That's what happens when I rush. I didn't have a lot of options - all the scrap yowie bits fit in a grocery bag, and none of them are very large. I want to sort out a collar to attach to the hood still, and spat-ish foot coverings. Its going to be interesting.

Monday, May 10, 2010

Hand sewing...

I ended up spending only a couple of hours stitching this weekend. It took a lot longer then I hoped/expected. I didn't draw on my stitching lines, so I was using my thumb as a gauge. I thought I was doing alright, until I turned it over. I am pleased with the fur, and how the nap is behaving. Anyway, someone has offered me use of their mom's sewing room, so I'm going to take that offer, and hopefully have the thing assembled by the end of this week. Then I can concentrate on the mask, which I'm planning on making out of vegetable tanned leather, which can be molded when wet, and holds its shape when it dries.

Friday, May 7, 2010

Yowie!!!!!...???

Yowie Costume

What: A yowie, an Australian ape-man legend, like big foot or sasquatch. Based on Simplicity Pattern 2853 with modifications.

Why: My boyfriend's final project student film

The Challenges:
  • I don't currently have a sewing machine. I plan to sew it all by hand, which will make a relatively simple pattern take a heck of a long time. I've been doing a lot of research/reading about historical sewing techniques (in preperation for future projects) so I'm looking at it as good practice.
  • I don't have a cutting table, or even a kitchen table, and the floor in our apartment is dumb uneven tile with wide grout lines that made altering the pattern a pain.
  • The fabric store, which is an hour and half away by transit, only had 2.75 m of the fake fur we wanted, and the pattern called for 3.5 m.
  • I have to figure out a way to make a believable mask, because there is no make up artist working on the film, and also "realistic" hands, which are going to be featured in a close up. I have a few ideas about how to accomplish this, but I'm making it up as I go.

This is the fur we settled on. My boyfriend asked if we could have the cardboard tube because he wanted to hit our roommate with it :p The store carried a beautiful long napped fur with a lighter under coat and a long, darker top coat, but it was 70 dollars a meter, which didn't fit in our budget of nothing. Considering we don't have a vaccuum cleaner, this is probably a better choice.

I originally planned to draft a pattern myself, but given my limited resources, time and skill in that area, I decided it would be less stressful to start with an established pattern. We went to the fabric store yesterday evening (got a ride from the director of photography on the film, bless him) and I started working on the pattern manipulations last night.

The pattern has very full sleeves and pant legs that are gathered with elastic. I want the yowie to have tight fitting sleeves to go over the 'glove' hands that I'm planning, and closer fitting legs. I did the sleeves last night, and then laid awake and thought about it and realized that I'd forgotten that the Simplicity pattern included seam allowances. I was already planning to put a little vent in the sleeves, but I ended up having to add seam allowance as well, or no one was getting their had through the sleeve opening.

I altered the pant leg pattern this morning, taking seam allowances into account, and planning a slit in the side seams there as well. The pattern includes spats, which I am going to attach to the bottom of the pant leg, and continue the opening to the bottom, rather then having separate pull-on spats. The plan is to use snaps to close the sleeve and pant vents, as well as the center back opening. The pattern calls for a zipper, but I have an irrational fear of installing zippers, compounded by the lack of sewing machine and the added difficulty of fake fur. Fur would get caught in a zipper anyway, right? Right.

After the pattern manipulations came the puzzle of figuring out a cutting layout when I was short .75m of fabric. I had already decided that I was going to reverse the nap, so we could fluff out the fur and have the yowie look as scruffy as possible. I ended up ignoring straight of grain all together to get all the main pattern pieces cut out. I'm hoping that this with add an additional degree of scruff, and maybe even look neat. I'm not worrying about the hood or spats right now - I think I have enough scraps left to patchwork together those pieces, again hoping that this will look cool and textured rather then stupid.


The pattern called for the layout to be done in a single layer, so I made duplicate pattern pieces from the free daily newspaper. You can see a bit of the floor that made drawing straight lines such a challenge. I finished the layout just as the boyfriend and our roommates got home from school, so I cut everything it out and joined them on the balcony for a beer. Will start sewing tomorrow.